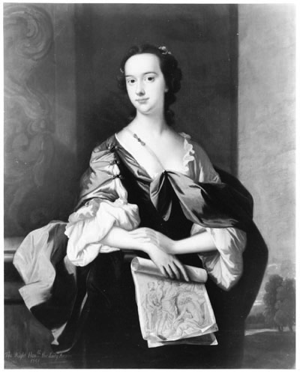
Nothing much occurred regarding the treasure until 1744, the year Lord George Anson returned from his epic round the world voyage. Of import to this story is the fact he rested his fleet at Juan Fernandez Island in 1741 and he had an encampment in the valley behind what is now known as Cumberland Bay. Lord George Anson was lauded for his exploits and inducted into the Royal Society in 1745. His book, A Voyage Around the World (1748), was a bestseller of the time. Due to his efforts in the service of England and the fact that he had sailed the waters where the treasure was located the Royal Society made him their steward of the secret. It was determined that a permanent copy of Ubilla’s map should be made to ensure the vital information it carried was never lost. Work commenced to execute this in 1748 and the permanent copy made of the map still exists to this day; it is known as the Shepherds Monument at Shugborough Hall.
The monument was designed by an astronomer named Thomas Wright who was associated with the Royal Society. The sculpting work was undertaken by the Flemish artisan Peter Scheemakers. Originally planned to be an overmantle (to grace the wall over the mantle of a large fireplace) it ended up being attached to wall of the estate’s kitchen garden. It remained there until Lord George Anson’s death in 1762 when a decision was made to install it in its own protective bower. This bower was constructed by James ‘Athenian’ Stuart who was working on other landscaping improvements at Shugborough Hall at the time. James Stuart was a member of the Royal Society and is known for his Greek influenced architecture. The bower was constructed utilising one of Thomas Wright’s earlier designs to which James Stuart added a Doric style aedicule.
The Shepherds Monument is a tableau loosely patterned on Nicolas Poussin’s 1640s painting ‘Happiness subdued by Death ‘ that is more commonly known as ‘The Shepherds of Arcadia II’, Poussin having executed two paintings of the same theme. The famous phrase associated with the painting ‘Et in Arcadia Ego’ implies ‘I (Death) am also in Arcadia’. There were a two main reasons why this image was chosen. One reason is that it could be easily adapted to fit that shapes shown on Ubilla’s map. The other is due to the secret alchemic message it displayed which became the master key for all the codes used.
Nicolas Poussin's elegant joke
Cardinal Rospigliosi commissioned Poussin to execute this work around 1640. Generally assumed to be themed as a memento mori, Poussin played a rather heretical joke by placing in the painting a message that the meaning of life can be found in the teachings of Alchemy. The 4 stages of Alchemy as described by the Greek philosopher Heraclitus are displayed by the colours of the robes of the shepherd and shepherdess: Melanosis (black), Leukosis (white), Xanthosis (yellow) and Iosis (red). The colours are also grouped in their alchemic ‘opposites’: black/white on the left and red/yellow on the right. This refers to the alchemic action known as the ‘coniunctio oppositorum’, the conjunction or adding together of opposites. This message is also given by understanding the esoteric import of the Tetramorphs or ‘Royal Stars’.
One can only wonder that it must have been amusing for Poussin to see this heretical message openly displayed in the Cardinal’s office.
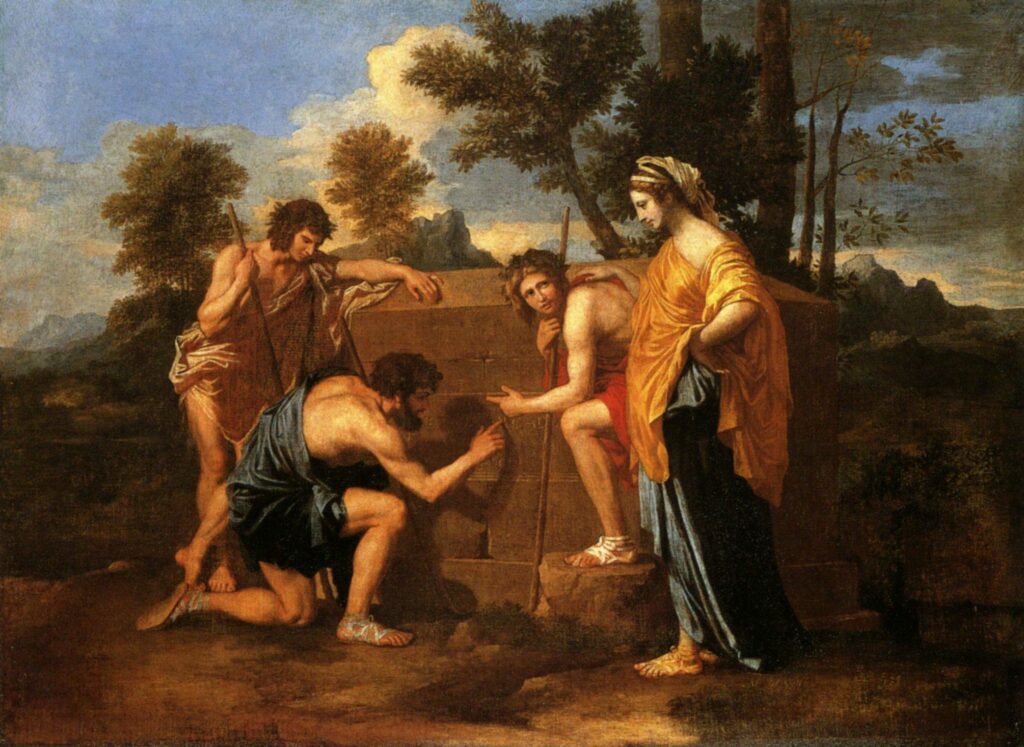
How to interpret the Shepherds Monument
When the monument was designed Poussin’s image needed to be stretched and elongated to adapt it to what is shown on the map. The addition of the ossuary on top of the image was done to fill in the extra space, it doesn’t mean that this all leads to the ‘bones of the shepherd’ or anything like that. That the image was reversed is not of import either. It was common at the time that copies of original artwork appeared in reverse, the result of using etching and printing plates which produced a reverse image. In this case the reversed format assisted in fitting the image to the shapes on the map.
The wreath on the ossuary was added to enhance the funereal appearance of the tableau along with the inscription D O.U.O.S.V.A.V.V. M
A wreath and the initials D M were commonly found appearing on Roman tombstones. D & M stood for ‘Dies Manibus’ which is a exhortative dedication to the Gods (Dies) of the Departed Shades (Manibus). The letters are just an alphanumeric code which gives the latitude and longitude for the centre datum point of the map.
All alchemists know the acronym V.I.T.R.I.O.L which is for the latin phrase ‘Visita Interiora Terrae Rectificando Invenies Occultum Lapidem’ (Visit the interior of the Earth, by rectification you will find the Hidden Stone).
As a clue it means that if you had the map you had to ‘go to the interior of the earth’ which is where the Manes can be found, in other words go to the ‘Manes’ on the Shepherds Monument and conduct your ‘rectification’.
Sailors of Lord George Anson’s time surprisingly were very familiar with the word Vitriol as a dose of Oil of Vitriol, a herbal concoction based on sulphuric acid, was thought to ward off scurvy.
The point of RECTIFICATION for the map is the letter R which is the tip of the shepherd’s thumb pointing to the letter R in the phrase ‘Et in Arcadia Ego’ inscribed on the tomb. Overlay the map to the monument by placing the centre of the map on the tip of the thumb and you get the following complete image. The shape produced by the shepherdess’ robes has been enhanced as this is necessary to understand later events.
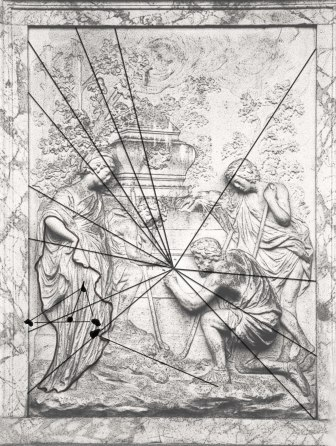
The key to the alphanumeric code is not much of a mystery either. It was published in 2004 in the book ‘The Knights Templar in the New World’ by William F.Mann. The book revealed the code key was seized from a lawyer named Zwack in 1786 during a political raid in England of a secret society called ‘The Illuminated Ones’. The society’s emblematic colours were Red and White, which as any alchemist knows are the symbolic colours for Male and Female in alchemy. Here is the alphanumeric key.
| A | B | C | D | E | F | G | H | I | J | K | L | M | N | O | P | Q | R | S | T | U | V | W | X | Y | Z |
| 12 | 13 | 10 | 9 | 8 | 7 | 6 | 5 | 4 | 4 | 3 | 2 | 1 | 13 | 14 | 15 | 16 | 17 | 18 | 19 | 20 | 20 | 21 | 22 | 23 | 24 |
The way the code deciphers is that D=9 and M =1 : this is the latitude as these two letters are on a latitudinally different level to the main group of letters. You read it right to left in ‘reverse’ as the monument is the ‘reverse’ of the original Poussin image, therefore 19 degrees latitude.
The main group of letters give 14(O) + 20(U) + 14(O) + 18(S) + 20(V) + 12(A) + 20(V) + 20(V) = 138 degrees longitude
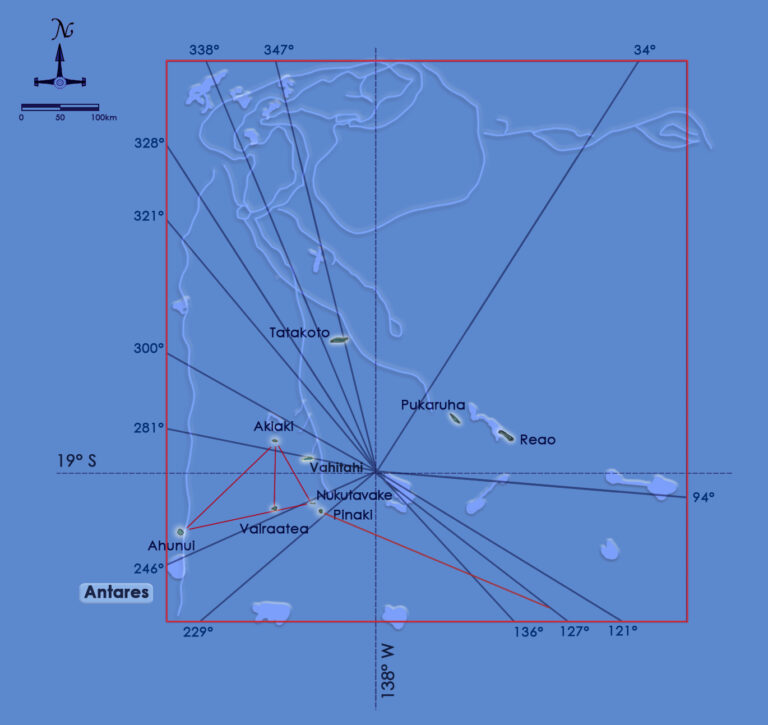
The centre of this grand map, the point of RECTIFICATION, is 19 degrees south, 138 degrees west of Greenwich.
Here it is plotted using modern mapping data. Some allowance has to be made between the positions as they were plotted in 1714 and their exact positions as they are now known. This reveals that Ubilla’s map was actually plotted from a position a few minutes north of the 19 degrees south latitudinal line. You will see that there is a group of islands in the south seas that conforms to the Golden Section Triangle shown on the map. This depiction of a Golden Section Triangle on a map to find the Holy Graal caused much confusion later.
Written in the top right corner of map Ubilla put the details in an alchemically coded form. Look to the words ‘RIO GRANDE’ (big river) in the top right corner, these were placed above the real cipher to distract and confuse. The cipher is the hebrew style letters directly below ‘RIO GRANDE’. These again are an alphanumeric based on a simple substitution code with a hebrew ‘letter’ equating to a letter in the english alphabet, the letters being RIOGA. As with the combined monument map you add the letter’s value from their numeric position in the english alphabet: R(18)+ I(9)+O(15) then G(7) and A(1).
RIO: 42 longitude
GA: 71 latitude
The alchemic ‘key’ is the ‘coniunctio’ in that you use the ‘opposite’. It will be found occurring all the way through the history and codes:
180 degrees – 42 degrees = 138 degrees west of Greenwich.
90 degrees – 71 = 19 degree south.
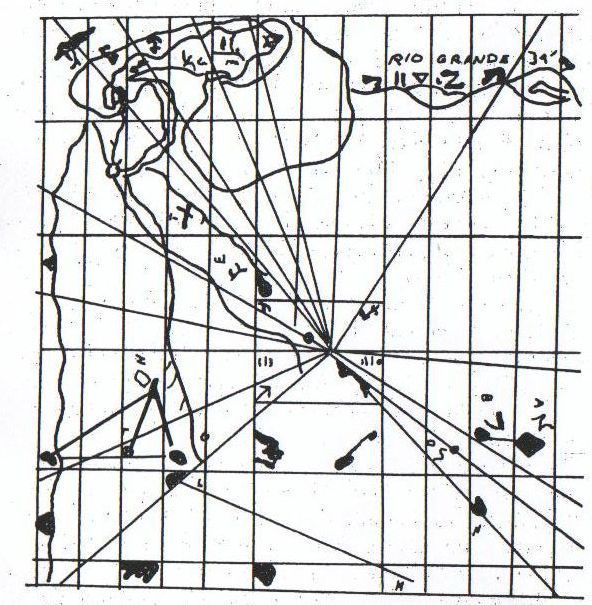
Though this was written on the map Ubilla had also used the phrase ‘Cero tres Puntas’, the ‘Zero (cipher) of the longitude for the Three Points’. It was a standard way Spanish navigators kept the secret of their location. The word zero and cipher have the same roots and are the same word. They come from the Arabic word ‘sifr’ as it was Arabic mathematicians invented the numeral of ‘nothing’: zero. Though the words zero and cipher mean the same thing, today we tend to use the word ‘zero’ when speaking about the numeral and ‘cipher’ when speaking about codes which have symbols or letters assigned a secret value.
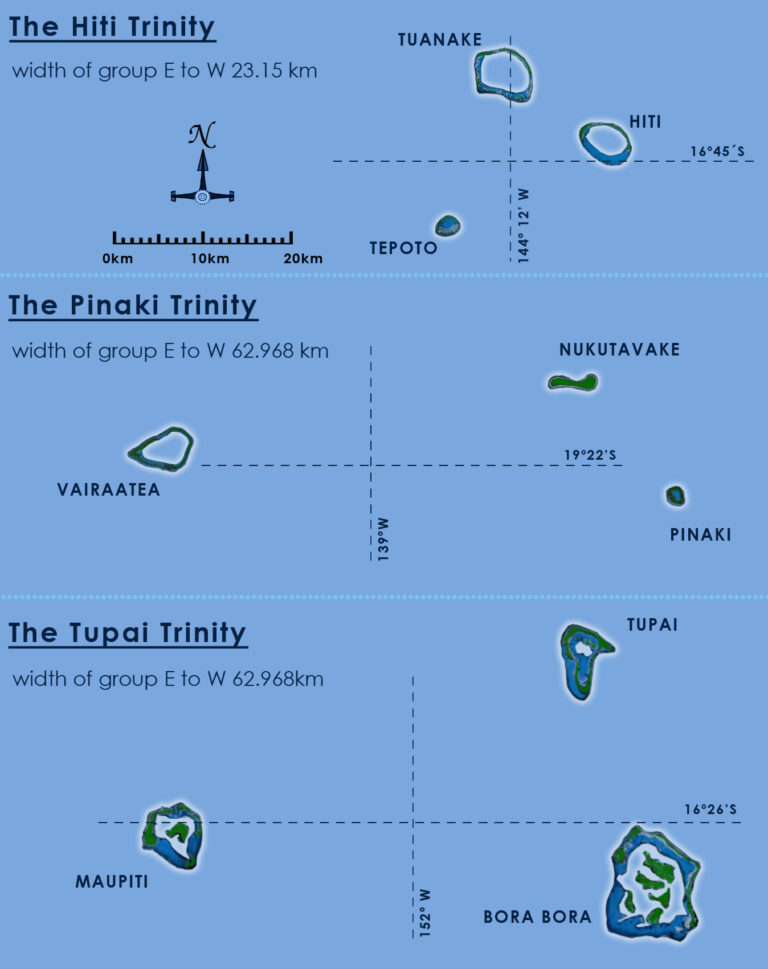
Ubilla’s cipher of longitude for the Three Points was 139 degrees west of Greenwich. This identifies the location of the first codeword ‘Trinity’ which is a three island group. The phrase ‘Cero tres Puntas’ was to cause a lot of confusion later as it is similar in sound to ‘Cerro tres Puntas’ which means ‘Hill of Three Points’. Many persons ended up searching for 3 mountains laid out in a triangle or a hill that had three peaks.
Here are some of the ‘Trinity’ group of islands in the south seas searched by those who held copies of the fabulous map. The correct Trinity (centre) is at 139 degrees west of Greenwich and forms part of the Golden Section Triangle shown on the map.
“Once upon a time there was a three masts ship which transported between Peru and Spain, the treasures recovered by the Spanish conquerors. The business was too tempting for the captain to resist so he decided to leave without awaiting his escort. He thus set sail on a beautiful moonless night and sailed towards sparsely settled places where he was less likely to be noticed by corsairs or the King’s ship. A combat took place nevertheless against a sloop of which the crew was made prisoner and taken on board. After days on a west cours this three- masted ship reached Moruroa whose lagoon allowed for a safe anchoring, to replenish with water and food. The captain made the decision then to hide in the ground part of his treasure and charged his lieutenant and two men to have the prisoners dig a hole large enough to contain the trunks. During the operation the prisoners revolted and killed the lieutenant and his men. The rebellion was quickly subdued and the furious captain, killed all the prisoners whom he buried with his trunks in the hole that had been prepared. This captain and his ship never had a chance because it sank a little afterwards and nobody til this day has found, on the ‘Motu Te Papa’ the treasure which is hidden within twelve steps to the west from a sign representing a hand.
I don’t know if there is any truth to this legend but I wonder whether the atoll would not owe its name to him which it would be necessary to interpret like that of an island which has its great secrecy.”
After 1748 when the Shepherds Monument was constructed the Royal Society was content to do nothing as to the treasure. This lasted until 1760, when the marriage of King George III to a suitable partner was being planned. A decision was then made by the Royal Society to recover the treasure.
By this time it had been fairly well settled that the House of Hanover was now the ruling Royal House of the Crown of England. A marriage into the correct bloodline would seal the breach that occurred after the fall of the House of Stuart and allow again a claim that the Crown of England was held by true Divine Sovereigns. Princess Charlotte Sophia, of Habsburg lineage, was chosen to be the royal bride (an attempt at the same thing made years later by the French with the marriage of Louis XVI to Marie Antoinette met with disastrous results). No doubt the intent was to produce the Temple items at the royal wedding to display the legitimacy of the English Crown’s claim to be the true rulers of the world.
Lord George Anson tasked the secret recovery of the treasure to a trusted agent named Cornelius Webb and gave him command of a ship named Unicorn. The ship sailed in 1760 to the south seas using Ubilla’s directions and successfully located the island and the cache. As the recovery was being undertaken a tropical storm intervened damaging the ship. Webb decided the ship was too damaged to risk transporting the treasure so ordered the treasure be re-cached. The crew were not impressed and their cupidity overtook them after seeing the vast collection of riches. A mutiny was imminent but news of the unrest reached Webb via those few of the crew still loyal to the mission. Rather than risking the loss of this most valuable of treasures Webb set a fire in the powder room before escaping in a small boat. This destroyed the ship killing all onboard, both mutineers and faithful crew alike. Upon reaching Valparaiso Webb fell terminally ill (reported variously as being Yellow Fever). He penned and dispatched his final report about the fate of the mission to Lord George Anson in the hope it would reach him.
It never did. Lord George Anson died in 1762, the report arriving after his death.
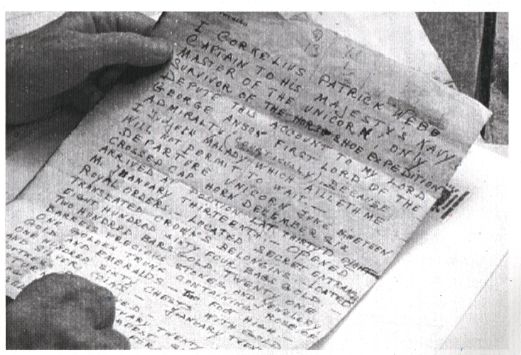
The language Webb communicated in was the language of the scholars, Latin. A badly translated copy of Webb’s report then went into circulation. A version is shown here. That the report was encoded using alchemically veiled terminology is still obvious despite the bad translation.
These series of events spawned the legend of the mysterious sailor who died leaving a coded map to find a treasure on an island. Yet the persona of the sailor spoken about in the stories is not just that of Webb, it is a mixture of Ubilla, Anson and Webb; all sailors who died and left the coded directions and a map to find the Holy Graal. Look closely at all the famous ‘lost treasure’ stories. You will find they all carry the detail that they originated from a man who died and left the directions to find the treasure.
All in the family
Lady Anson was in on the secret too! Here she is discreetly pointing to what is thought to be Poussin’s actual working sketch of ‘Shepherds of Arcadia I’.
Coming up: The Tetramorphs and how they also identifed the location by colour. The map escapes and causes mass confusion in the 19th century.
